App guide
A tour of every Mutant tab: click the tabs on top — just like in the app itself. The screenshot and the explanation switch to the selected tab.
 MUTANT
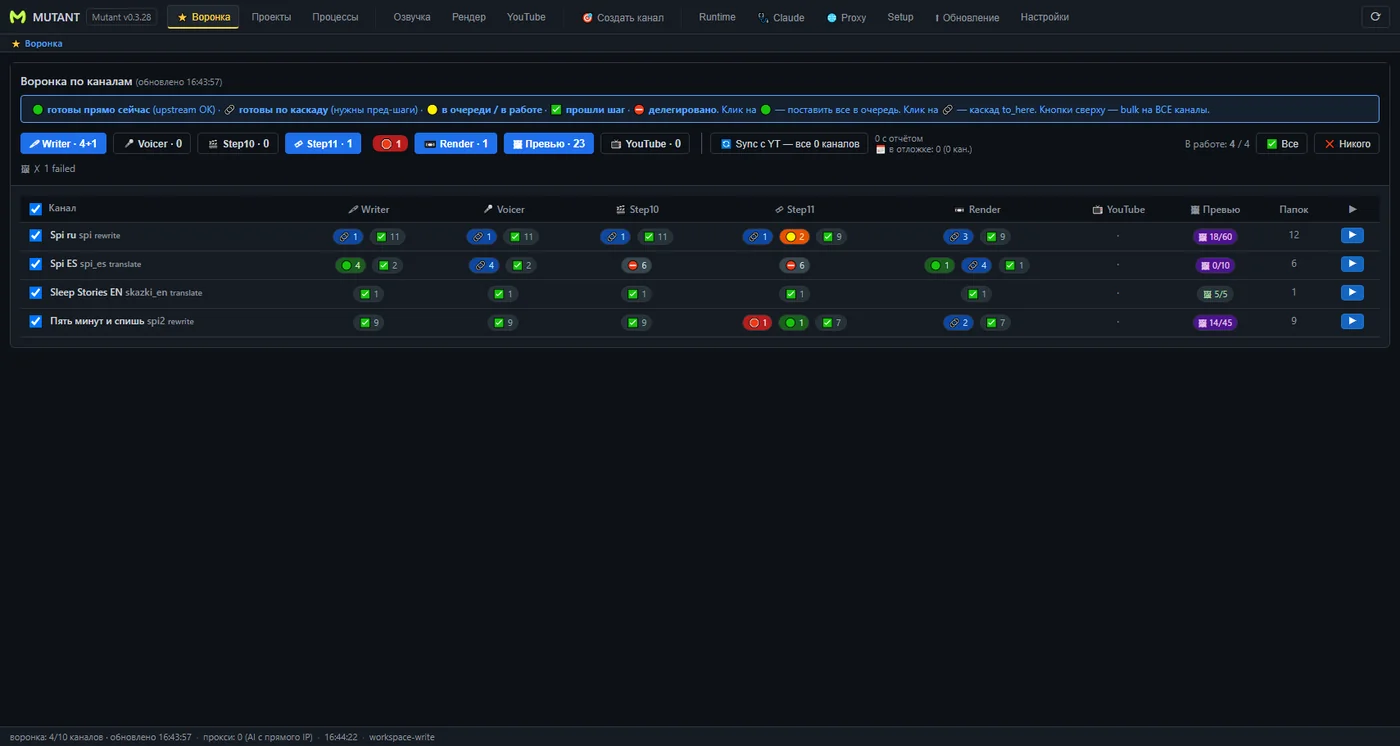
Click a tab on the bar above — the screenshot and the text below will change.
⭐ Funnel
What it is
Funnel is the main screen of the app. Your whole pipeline at a glance: each row is one of your channels, each column is a production stage (text → voice-over → visuals → assembly → YouTube).
How to read it
The table cells contain colored circles with numbers. The number is how many videos are at that stage:
- Green — videos are ready to move forward right now.
- Yellow — already queued or in progress, just wait.
- Checkmark — this stage is done.
- Red — something needs your attention.
What to click
- Click a green circle — queue those videos. The app does the rest.
- Top buttons (Writer, Voicer, Render…) — run a stage on all channels with one click.
- Sync with YT — check against YouTube: what's already published.
- All / None (on the right) — choose which channels join the bulk run.
Not sure where to start your day? Start with the Funnel: the green circles show where work is ready.
Projects
What it is
Projects — all videos of one channel as a list. Each row is one video, and the chain of buttons in the row are the steps it goes through: from text to publishing.
What to click
- Channel (top left) — pick which channel you're looking at.
- + Next video — add a new video to the works. The most important button here.
- The All button in a row — run the whole chain of steps for that video. Usually that's all you need.
- Step buttons (RW1, RW2… Voice, Render, YouTube) — run a single step manually if needed.
- Folder icon — open the video's files on disk. Pencil — make edits. Red trash can — delete.
Tips
- The green “ready to publish” label means the video is fully assembled and waiting to be uploaded to YouTube.
- Blue numbers like “0/37” mean the step is running right now and you can see its progress.
The usual routine: click “+ Next video” → click “All” → go have some tea. Then watch the progress on the Processes tab.
Processes
What it is
Processes — what's happening right now. If the Funnel is the plan, Processes is the live feed: which tasks are running, which finished, which stumbled.
How to read it
- Top cards: running — working now, queued — waiting in line, failed — errored, videos — how many videos are in the works.
- Each table row is one task: channel, video, step, status, and how long it took.
- Status done (green) — finished. running (blue) — in progress. failed (red) — an error; the reason is in the “Error” column.
What to click
- Filters on top (Channel / Step / Status) — quickly find what you need, e.g. all errors of one channel.
- Pause jobs — pause the pipeline. Start workers — resume.
- Folder icon in a row — open the task's files to inspect the result.
Seen a failed task? Don't worry. Open the row and read the error text: most of the time simply re-running the task fixes it.
Voice-over
What it is
Voice-over — where text turns into a voice. The app sends finished scripts to a voice service and gets back audio tracks for the videos.
How to read it
- At the top — the voice service balance and a counter of how many characters were spent this session.
- Three indicators show whether the voice workers (daemons) are running. A red dot means not running — just press the matching “Start” button.
- The table shows the queue and finished voice-overs: which channel, which video, which voice, how many characters, and how long it took.
What to click
- Start API / Local / Mat3u — turn on the voice service you use. Which one that is was configured when the channel was created; usually no need to touch it.
- Check API / Mat3u — test that the service responds.
- Kill all (red) — emergency stop of all voice jobs. For a rainy day.
In everyday life you visit this tab just to see “how are my voice-overs doing”: the queue fills and empties by itself.
Render
What it is
Render — assembling the finished video. Here images, video clips, the voice-over, and subtitles get glued into the final piece.
How to read it
- daemon: alive (green badge) — the assembler is running. Next to it you can see what it uses: enc: NVENC means “an NVIDIA graphics card” (the fastest way).
- Counters: in progress, queued, completed, errors, average time per video.
- Two tables: what's being assembled now and what's waiting in line.
What to click
- Pause / Resume — pause and resume the assembly. Handy if you need your computer for something else.
- Start daemon / Stop daemon — turn the assembler on and off.
Cloud rendering
If your computer is weak, you can hand the assembly to the cloud — a powerful server on the internet. The “local / cloud / auto” switch lives in the settings; the queue on this tab looks the same — the tasks just don't run on your PC.
The render queue fills up by itself when videos reach this stage. Usually nothing is required from you.
YouTube
What it is
YouTube — publishing the finished videos. Here the app connects to your YouTube channel and uploads the releases.
First-time setup (once)
- Pick the channel in the list at the top.
- In the OAuth / API section click “Connect channel in YouTube Publisher” and follow the prompts — the app will ask for access to your YouTube account. The “Google Cloud Credentials” link shows where to get the access file.
- If you use a proxy, put it into Proxy Guard (the format is shown on screen) and click “Check proxy”.
Publishing
- In the Publishing section: how many videos to upload at once (Limit), privacy (private/public), and “Schedule” — publish at a set time.
- The Publish button starts the upload.
Analytics
The “Refresh analytics” button pulls in your videos' view counts so you can see the picture right in the app.
The UPLOAD QUEUE counters at the bottom show the fate of uploads: uploaded — published, pending — waiting, failed — didn't make it (you can retry).
🎯 Create channel
What it is
The wizard for creating a new channel. You pick one of five types — and the wizard walks you through every step: collects data, analyzes style, sets up the rules, and adds the channel to the app.
The five channel types
- Rewrite — your own channel based on someone else's, in the same language. The best choice to start.
- Fast-Translate — quickly repeat your finished channel in another language.
- Translate — translate someone else's channel into another language, reworked.
- Encyclopedia — a popular-science channel built from web articles; no YouTube link needed.
- Find channels — no example yet? The app finds channels in your niche by keywords.
How the work goes
On the left is the list of steps: the wizard goes through them top to bottom and highlights where you are. Each step has hints at the bottom, and in manual mode the wizard pauses so you can review the result.
A detailed step-by-step walkthrough is in the separate guide How to create your first channel.
Runtime
What it is
Runtime — fine-grained settings of each channel. This defines which AI models work at each production step. The defaults are already well chosen — in everyday life you don't need to come here.
How it's organized
- Pick the channel at the top.
- Below are sections per stage (Re-Write, Translate, and others). For each step you can see the main model and the fallback used if the main one is unavailable.
- The “overridden” mark means this channel's value differs from the shared default.
What to click
- Changed a value → Save.
- Discard edits — revert to how it was.
- Reset to defaults — back to factory settings.
- Apply to all — push the setting to every channel at once.
A simple rule: if unsure — don't change it. The defaults are tested and they work.
Claude
What it is
Claude — the hub of all AI connections. One tab where you can see whether the main AI (Claude) is connected and whether the other services' keys are in order.
The top card — your Claude
- A green “Claude connected” check — all good.
- Test connection — send a short test request to make sure the AI responds.
- Sign out — unlink the account (e.g. to sign in with another one).
AI connections
Below are cards of the other services (for video imagery and other steps):
- The on checkbox — the service is in use.
- Enter key — paste the access key you got on the service's website (the link is right in the card).
- Check — the app verifies the key works.
- Show IP — see which address the traffic goes out from (matters when using proxies).
The rule is simple: wherever it's green — it works. A red “key not set” — click “Enter key”.
🌐 Proxy
What it is
Proxy — the list of proxy addresses for AI connections. You only need it if some AI services aren't reachable directly in your country. If you don't use proxies — you can skip this tab entirely.
How to use it
- Paste proxy addresses into the big field — one per line. Any of the formats shown on screen works (the simple
HOST:PORT:USER:PASSis fine). - Click Save — the app normalizes everything itself.
- Click Check proxies — working ones get marked, dead ones become visible.
Where it's used
Every AI connection on the Claude tab can be given a route: direct (“System”) or via this list (“Proxy list”). The app takes the first working proxy from the list.
Lines starting with # count as disabled — a handy way to temporarily turn a proxy off without deleting it.
Setup
What it is
Setup — a readiness check of your computer. It shows whether all the components the app needs are installed (Python, ffmpeg, and others) and measures how fast your hardware assembles video.
Dependencies
- Green checks — everything's in place. On first install the app downloads what's missing by itself.
- Install everything — fetch and install all missing pieces with one button.
- Restart the app — needed once after the first setup.
Render speed test
At the bottom — a check of your graphics card:
- The app tries every available way to assemble video (NVIDIA/Intel/AMD graphics card or the CPU) and picks the fastest.
- The forecast says it in plain words: “a 50-minute video ≈ 9 min”.
- Test render — run the check again (e.g. after upgrading your graphics card).
People visit this tab once after installing — and then only if something breaks.
⬆ Update
What it is
Update — the app version and the changelog. Here you can see which version you're on, what's new, and switch to any version.
What to click
- Check for updates — see if a new version is out. If it is, a download button appears.
- The list on the left shows all versions. Click any — the right side shows what was fixed and added.
- Switch — move to the selected version. Works both ways: you can update or roll back if something isn't right. Keys and settings are kept.
How updating works
Updating is always manual: the app never restarts itself in the middle of work. It only tells you a new version exists — you start the download and install. The installer closes the app, updates the files, and starts it again.
Tip: don't be afraid to update. If the new version isn't to your liking, the “Switch” button brings the previous one back in a couple of minutes.
Settings
What it is
Settings — the list of your channels and their folders. Here you can see where each channel's files live on disk and tidy things up.
What you can do here
- Change the path — point the channel's files to another folder (the “Path” field + Save).
- Open — open the channel's folder in Explorer.
- Remove — remove the channel from the app. Important: the files on disk are not deleted; the channel just disappears from the lists.
- Drag rows by the ⋮⋮ handle — change the channel order across all app lists, then “Save order”.
- Channel Doctor — a health check: the app inspects all channels and tells you if something's off.
If a channel moved to another drive — just fix the path here and everything keeps working.